Tuesday 28 October 2014

Thilakanathan Studios Blog moved to ThilakanathanStudios.com


Once again, my blog has migrated! The blog now lives at http://thilakanathanstudios.com!
The main reason was that I felt I needed a more professional look to my site if I'm to do this long-term. Blogger is great and its interface was very fun to work with, but the only problem I felt was that it wasn't flexible enough. Also, I found the interface didn't always look good with Blogger. Sometimes my thumbnails looked stretched, other times it just disappeared off screen. I'm not an expert at HTML/CSS and have opted to use a professional WordPress template which has been tried and tested on various OS and mobile devices. I wanted a bit more control over my site and hence the move to WordPress. Feel free to give me any feedback on the new look of the site!

ThilakanathanStudios.com


How I Started Making Animated Short Films! PART 2

Once I entered Uni, I was itching to go back and fulfill my dream of making an animated film. I then did proper research. After reading many software reviews and the features it contained, I decided to settle with the software I promised I would never look at again... Blender! I saw some user images and was awestruck with the level of quality that was able to be produced with free software. I could never afford 1000 bucks for those Maya, 3DS max, C4D type of software, so I figured Blender would be close enough. It contained a lot of very good modelling tools, a neat renderer, and some cool physical simulation tools which I found to be a very cool bonus! So, I gritted my teeth and decided to follow the Noob-to-Pro Blender tutorials for a few months. After that, I snacked on a lot of Blender video tutorials found on YouTube. I particularly found Andrew Price’s tutorials inspiring and motivated me to keep going. I also found BlenderCookie to assist greatly as it helped cover almost all aspects of Blender. After about 6 months of tutorials, I decided it was finally time to make an animated short film.

I would then spend another few months or so, researching how animated films are made. Thankfully, YouTube existed then and I looked at the process of Pixar and how they made films like Toy Story, etc. I also read a lot of articles on how films are made and started to at least get an idea of how films are made. I realised at this point, I needed a lot of patience and planning BEFORE I started to even touch Blender. I learnt the basic concepts of script writing, storyboarding and animatics. I was not the best at it (still not!) but at least it would guarantee that the project would not fail before it even started.

After this, I managed to complete my first animated project ‘Theevan’. It’s not the best film out there and does not even compare to Toy Story or Avatar, but it’s the best thing I ever made on my own. A tremendous level of satisfaction ensued and gave me a lot of motivation to make more short films. ‘Theevan’ does has a lot of technical flaws and I will document the making of ‘Theevan’ in another blog post. The biggest mistake I made with ‘Theevan’ was starting the project too early. I should have waited until I had a bit more experience instead of rushing ahead and producing a half-done film.


My final advice to people out there interested in making animated films with zero budget and zero educational training, is to have a lot of patience. A LOT of it! You also need plenty of motivation if you want the project to reach its completion. I may write another blog on how to make animated films later on but this is how I started making animated short films. Follow tutorials to the point that you feel you can make your own stuff. And learn the process of filmmaking from the abundance of content available on the internet today. With the improvements and capabilities of content and technology today, it is possible that you could one day make your own animated short film!

This is the same blog post that was posted from my original website and was posted here as a reference: http://thilakanathanstudios.weebly.com

Monday 27 October 2014

How I Started Making Animated Short Films! PART 1

All throughout my childhood I really enjoyed watching animated films and I guess it hasn’t really stopped. It started with Toy Story, then it was Finding Nemo and even now, as a fully grown adult, Avatar. There’s something about animated films that I loved in comparison to live action films. It might be the fact that we are able to create our own parallel universe and script our own events the way we want it. There was a time, perhaps during my high school years, that I dreamt of creating my own world.
I started out with the idea of making a city. So I searched everywhere on the internet for software that will allow me to do just that. Maya and 3DS Max were the top two results from my online research. So I tried the trial versions. I was initially confused when I started and became even more confused when the trial expired. So I looked for free alternatives. I tried Blender (version 2.4x at the time). The interface was clunky and when I tried to do simple things like select an object, it never really turned out what I expected. It only gave me so much headache and frustration that I vowed to never use that software again. So instead, I continued looking for free alternatives that were easy-to-use. I found a software called Anim8or. At the time of writing, the website for it still exists (anim8or.com) however, it appears that development for it has since been discontinued. I found Anim8or to be extremely easy to do things and the interface was nice and simple enough. After following a few easy tutorials, I set out to make my city.

The result? Not so spectacular! Really just a bunch of cubes and cylinders organised to look something like a city. In fact, it took me weeks to figure out how to do this. After this, I set out to make a short film project. It failed as quickly as it started. I struggled to make characters and when I finally did make a character (a very poor one at that), I struggled to rig the character for animation. Anim8or was not particularly robust with character animation, but what would I know. But I feel the main reason why the project failed was due to a lot of overconfidence and a lack of patience. I had an idea of a story in my head and decided I would make the story up as I animate. I had no script, no storyboard, no character planning, nothing. The hype I created over my own film died without a single shot being animated.
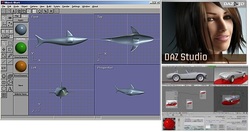
I then played around with other free 3D software. I looked at tools that would do good character animation. I found Daz Studio. I couldn’t properly animate a character without it freezing a lot. That may in part be due to a pretty old and weak PC.

I then worked on creating better virtual environments. I found Bryce. It was pretty neat in that it created natural environments well and also quickly but was limited when it came to interior scenes and did not handle character animation at all. Feeling frustrated, I quit! For a few years at least…

This is the same blog post that was posted from my original website and was re-posted here as a reference: http://thilakanathanstudios.weebly.com

Sunday 26 October 2014

Monkaa - Comedy Animated Open Movie

Here is an animated short film by Weybec Studio and Blender Institute called "Monkaa". Everything here was made using only free software such as Blender and GIMP.

A very well made comedy animated film. You can also download all the project files and tutorials on cloud.blender.org!


Produced by: Weybec
Released by Blender Institute, in Blender Cloud and the blender.org e-store

http://www.weybec.com
http://cloud.blender.org

Free Environments For Your Next Film!

Hey Blender users! Your next animated feel-good short film can be much easier!


Here are some scenes you can use for free in your own Blender projects! Whether it be games, movies, 3D artwork, visualisation, YouTube videos or anything else, you are FREE to use it in any way you wish. The licence is CC-BY meaning you're free to use it even for commercial purposes as long as you credit me anywhere in your project.

I created these environments as part of my short film "Vetri" which you can watch below.


You'll find most of the sets are available free to download for your own projects. The pack includes streets, wedding halls, exam halls, lecture halls (a lot of halls!), a boy's bedroom, a bridge and house corridor.


You can download the full pack here! (You'll need to register for a BlendSwap account. BlendSwap is a free Blender model download site.)

Saturday 25 October 2014

What "Uyir" is all about!


"Uyir" will be my 4th independently made animated short film after "Theevan", "Vetri" and "Tripping". The main goal of this short film will be to improve on my previous flaws, character animation and story.

I think I might have actually developed a good story but whether the screenplay will live upto it is another story altogether. If it pulls off, I'm a little bit confident that this story will be far better than any of my previous films as this has an important message which I think might resonate with viewers. To be very brief without revealing much about the plot, the story is about a joyous old wealthy man who loves spending time with his granddaughter and reading his newspaper. His world is suddenly flipped upside down when he gets kidnapped by a group of thugs demanding money. How he fights the thugs and gets back home and to his granddaughter forms the crux of the story. Hope this sounds interesting enough, lol. Think I might use that for the synopsis...

Character animation has never been my forte. This is something I'm really looking to improve. I've currently read a few books on this subject and have gained really valuable and insightful feedback from people who have seen my previous stuff (thanks guys!). This is going to take a LOT of work, but I hope the end result will be far more convincing than "Vetri".

Uyir will have a fair dose of simulations such as fluid, cloth, fire, hair, etc. There are also higher-detailed sets and characters in this. Really hoping my PC can withstand my scenes. Uyir will also be my first film focusing more on the 'art' side of things. I will be spending a bit more time on the post-production phase, to improve on the compositing of the film and create a film that hopefully not only has nice animation and story, but is also pleasing on the eye. Uyir will be a semi-photorealistic and semi-cartoony film.

I will be utilising the BURP renderfarm to render my frames. I hope to get the film ready sometime within December 2014 - February 2015 depending on how fast I work and how fast my stuff gets rendered! Will keep posting updates every Saturday!

Uyir's Official Website is finally open! Check it out here: http://uyirthefilm.weebly.com

Friday 24 October 2014

Quick Tip: Cloth Simulation in 5 minutes!

In this Quick Tip post, I'll show how to quickly set up cloth simulation so that you can use Blender to create cool-looking cloth animation.


Cloth animation can enhance the realism of your characters and create a more lively scene. Not only for characters, but any object made out of cloth can benefit from cloth movement, such as flags, tablecloth, paper and so on.

Step 1: To set up a cloth simulation in Blender, start out with a UV sphere and a plane. The plane will act as our cloth and the UV sphere our collision object. Make sure you subdivide the plane about 10 times in edit mode (Adding a subsurf modifier also helps add more realistic bends and wrinkles in your cloth but will be slower to view in the viewport. It's best to leave this step to the end).

Step 2: Select the plane and enable type 'Cloth' in the Physics panel. Tweak the cloth settings to your hearts desire. I've just left the default as is.

Step 3: If you playback the scene (Alt+A to play, ESC to cancel), you'll notice the cloth falls through our UV sphere and doesn't collide with it. Well to do this, we'll need to specify the sphere to be a collision object. You can define the amount of friction or the amount of "stickiness" of the collision object using these settings. 

 Step 4: If you playback the animation now, you'll notice you now have the cloth colliding with the sphere!

Additional Tip!
Sometimes when you're creating an animated film, you might want to have certain parts of a dress for example stuck to the character with no cloth simulation while other parts move freely. To do this, you can set a "pin" option. Here's how you can do this:

Step 1: Go to the Object data panel and create a new vertext group. You can name this whatever you like but I named it "pinnedCloth". Then, go into edit mode of the plane and select vertices you want pinned and assign it.
Alternatively, you can paint the vertex group in Weight paint mode as well. Anything in red shows where the pinning will occur.

Step 2: In the cloth settings, enable pinning and select the vertex group.

Playing back the animation will now clearly show the pinning occuring. The "pinned" vertices stay in place while the other vertices move according to the cloth simulation.
Pinning is effective when it comes to animating things like a dress, a flag or even someone holding a piece of cloth. You can have your dress parented to your armature and pin those vertices but leave the lower part of the dress without pinning so that the lower part of the dress can move naturally like a skirt.

Here is Blender's cloth simulation in action in my upcoming animated short film "Uyir"!

That's it! Hope this quick tip helped!


Thursday 23 October 2014

Beginner Tutorial: How To Create and Setup a Door for Animation in Blender

In this post, I'll show you how to create a simple door and set it up for easy animation of a door opening and closing.


Step 1: To begin with, I recommend downloading a reference image of a door from somewhere like Google Images. This makes the process of modelling so much easier and you don't have to always guess proportions.

Step 2: Enable Background images from the sidebar and add your reference image. Select the viewpoint to be 'Front' and scale/position to the relevant size of a door.

Step 3: Position the default cube around the base of the door. Then go into edit mode and scale the cube to fit the door. You may need to see through in order to see the reference image, press z to show wireframe mode. Now you should be able to see the reference image easier and scale and position your vertices better according to the reference image.

Step 4: Also remember to scale the door on y-axis to match the thickness of the door. If you have a reference for this you can use it, but in my case I sort of just guessed it..

Step 5: Assuming you're using the same reference image as mine, add 4 loop cuts by pressing Ctrl+R and hovering around the base of the door. Before clicking, scroll to a value of 4. If you don't have a mouse scroll (like laptop users for instance), you can also press the '+' symbol 4 times. Make sure to position the loops to fit the door design thingy (sorry, not sure of the actual name for it :/).

Step 6: Also add loop cuts horizontally about 6 times and position them as well.

Step 7: Select each face where the design thingies occur and extrude back a little bit.

Step 8: Change the pivot centre to 'Individual Origins'. This way any scaling you do to the faces for instance, will scale along the midpoint of the faces you've selected and not around the overall midpoint of the doors, if that makes sense. You can try with/without this to see what I mean. Now scale inwards by simple pressing S and choosing an appropriate scaling.

Step 9: Extrude once more outwards and scale in a bit as well.

Step 10: We'll also quickly create a *very* simple door frame. Start out by adding a cube and scaling it so that it is thinner overall, but thicker than the door. Position it to the side of the door and the bottom.

Step 11: Select the door itself and press Shift+S and then 'Cursor to Selected'. 

Step 12: Select the door frame and press Shift+Ctrl+Alt+C and press 'Origin to 3D Cursor'. This now places the orange dot, and thus makes the centre of the door frame the same position as the centre of the door.

Step 13: Add a mirror modifier and enable clipping. You should see the door frame fitting perfectly across the other side of the door.

Step 14: Go into edit mode and select the top face. Move the top face to just a tad bit above the height of the door. You don't need to move it a tad bit above the door, but I just find it adds a bit more realism.

Step 15: Now extrude the top face a bit. Select the left face of the newly created extrusion and extrude that all the way till it collides with its mirror. Since you enabled 'clipping', it should lock together nicely.

Step 16: Our door is pretty much done! We can now focus a little more on the details. Select all the faces of the door design boxes and also the faces of the original extrusion boxes (like in the image below). Then add a bevel to smooth this out. This helps enhance realism better. Do this by pressing Ctrl+B and dragging. Only drag a tiny amount. Don't overdo it or it might look too smooth and more cartoony. Scrolling or (or +ing) will add more segments and thus more smooth curvature to your bevel.


Step 17: Add some bevelling to the inner edges of the door frame as well.

Step 18: Add a simple door handle. Start with a cylinder, then scale, then extrude a couple of times to create the base of the door handle. For the handle itself, just add a UV sphere.

Step 19: Now select the bottom corner 2 vertices of the door itself in edit mode and snap the cursor to that position.

Step 20: Add an empty.

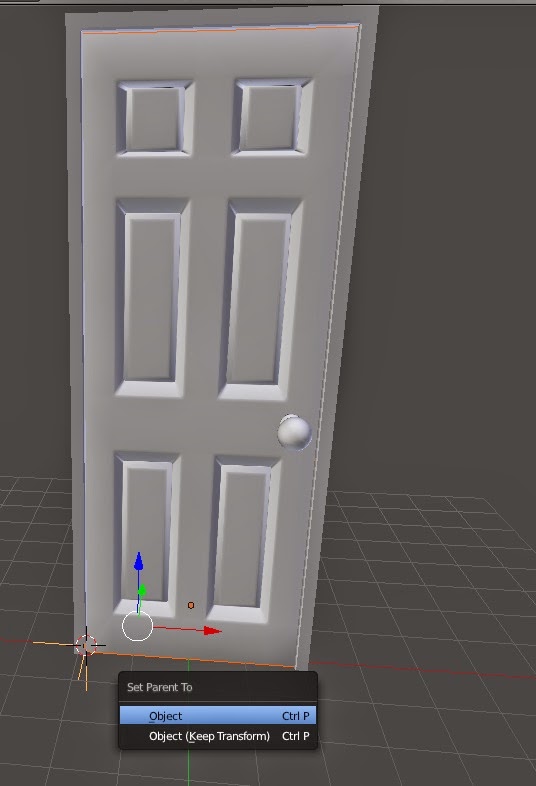
Step 21: First select the door, and then select the empty. Press Ctrl+P and select Object. This parents the door to the empty. The ordering is important here, selecting the empty first would parent the empty to the door which is pointless.

Step 22: You can now rotate the empty on the z-axis and your door should open and close! You're door is now ready for an animated environment!

Step 23: Well actually, it's not quite ready without creating a material for the door. Open another window and select UV/image editor. Then in the 3D viewport, select all faces of the door in edit mode (and while in front view) and press U-->Project from View. This UV unwraps the door according to the view you're in.

Step 24: You can directly tweak the UV coordinates in the UV/image editor. Oh, and make sure to add a shader for the door (diffuse BSDF is fine for starting out), and add an 'Image Texture' of the reference image. You don't have to use your reference image. You can also use other wooden textures if you wish. I also recommend you create a different shader for the door handle. For instance, you could create a Glossy BSDF shader for the door handle to get a reflective chrome type material for the handle.

Step 25: That's it! Your door is now ready for films, games, etc..

 Feel free to ask questions below if you're stuck on anything!


Subscribe to our Newsletter

Buzz Me?

Subscribe to my YouTube channel!