In this post, I'll show you how to create a simple door and set it up for easy animation of a door opening and closing.
Step 1: To begin with, I recommend downloading a reference image of a door from somewhere like Google Images. This makes the process of modelling so much easier and you don't have to always guess proportions.
Step 2: Enable Background images from the sidebar and add your reference image. Select the viewpoint to be 'Front' and scale/position to the relevant size of a door.
Step 3: Position the default cube around the base of the door. Then go into edit mode and scale the cube to fit the door. You may need to see through in order to see the reference image, press z to show wireframe mode. Now you should be able to see the reference image easier and scale and position your vertices better according to the reference image.
Step 4: Also remember to scale the door on y-axis to match the thickness of the door. If you have a reference for this you can use it, but in my case I sort of just guessed it..
Step 5: Assuming you're using the same reference image as mine, add 4 loop cuts by pressing Ctrl+R and hovering around the base of the door. Before clicking, scroll to a value of 4. If you don't have a mouse scroll (like laptop users for instance), you can also press the '+' symbol 4 times. Make sure to position the loops to fit the door design thingy (sorry, not sure of the actual name for it :/).
Step 6: Also add loop cuts horizontally about 6 times and position them as well.
Step 7: Select each face where the design thingies occur and extrude back a little bit.
Step 8: Change the pivot centre to 'Individual Origins'. This way any scaling you do to the faces for instance, will scale along the midpoint of the faces you've selected and not around the overall midpoint of the doors, if that makes sense. You can try with/without this to see what I mean. Now scale inwards by simple pressing S and choosing an appropriate scaling.
Step 9: Extrude once more outwards and scale in a bit as well.
Step 10: We'll also quickly create a *very* simple door frame. Start out by adding a cube and scaling it so that it is thinner overall, but thicker than the door. Position it to the side of the door and the bottom.
Step 11: Select the door itself and press Shift+S and then 'Cursor to Selected'.
Step 12: Select the door frame and press Shift+Ctrl+Alt+C and press 'Origin to 3D Cursor'. This now places the orange dot, and thus makes the centre of the door frame the same position as the centre of the door.
Step 13: Add a mirror modifier and enable clipping. You should see the door frame fitting perfectly across the other side of the door.
Step 14: Go into edit mode and select the top face. Move the top face to just a tad bit above the height of the door. You don't need to move it a tad bit above the door, but I just find it adds a bit more realism.
Step 15: Now extrude the top face a bit. Select the left face of the newly created extrusion and extrude that all the way till it collides with its mirror. Since you enabled 'clipping', it should lock together nicely.
Step 16: Our door is pretty much done! We can now focus a little more on the details. Select all the faces of the door design boxes and also the faces of the original extrusion boxes (like in the image below). Then add a bevel to smooth this out. This helps enhance realism better. Do this by pressing Ctrl+B and dragging. Only drag a tiny amount. Don't overdo it or it might look too smooth and more cartoony. Scrolling or (or +ing) will add more segments and thus more smooth curvature to your bevel.
Step 17: Add some bevelling to the inner edges of the door frame as well.
Step 18: Add a simple door handle. Start with a cylinder, then scale, then extrude a couple of times to create the base of the door handle. For the handle itself, just add a UV sphere.
Step 19: Now select the bottom corner 2 vertices of the door itself in edit mode and snap the cursor to that position.
Step 20: Add an empty.
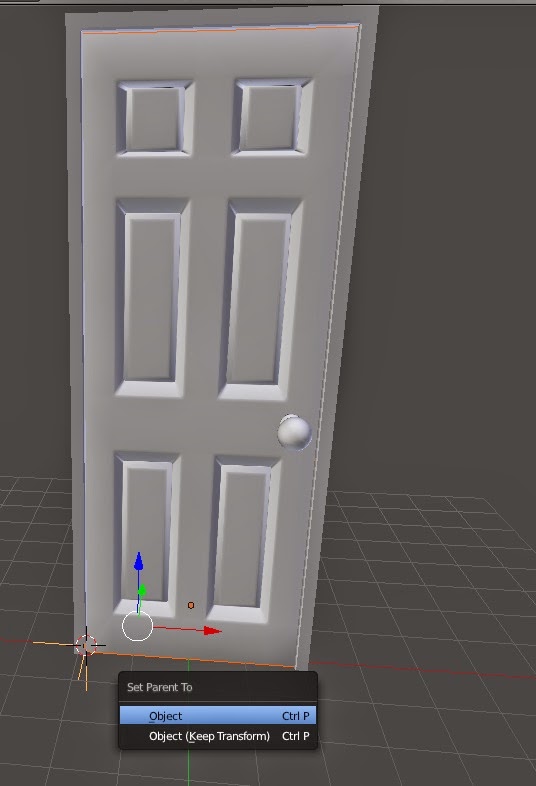
Step 21: First select the door, and then select the empty. Press Ctrl+P and select Object. This parents the door to the empty. The ordering is important here, selecting the empty first would parent the empty to the door which is pointless.
Step 22: You can now rotate the empty on the z-axis and your door should open and close! You're door is now ready for an animated environment!
Step 23: Well actually, it's not quite ready without creating a material for the door. Open another window and select UV/image editor. Then in the 3D viewport, select all faces of the door in edit mode (and while in front view) and press U-->Project from View. This UV unwraps the door according to the view you're in.
Step 24: You can directly tweak the UV coordinates in the UV/image editor. Oh, and make sure to add a shader for the door (diffuse BSDF is fine for starting out), and add an 'Image Texture' of the reference image. You don't have to use your reference image. You can also use other wooden textures if you wish. I also recommend you create a different shader for the door handle. For instance, you could create a Glossy BSDF shader for the door handle to get a reflective chrome type material for the handle.
Step 25: That's it! Your door is now ready for films, games, etc..
Feel free to ask questions below if you're stuck on anything!